Vitals & Clinical Notes
Introduction
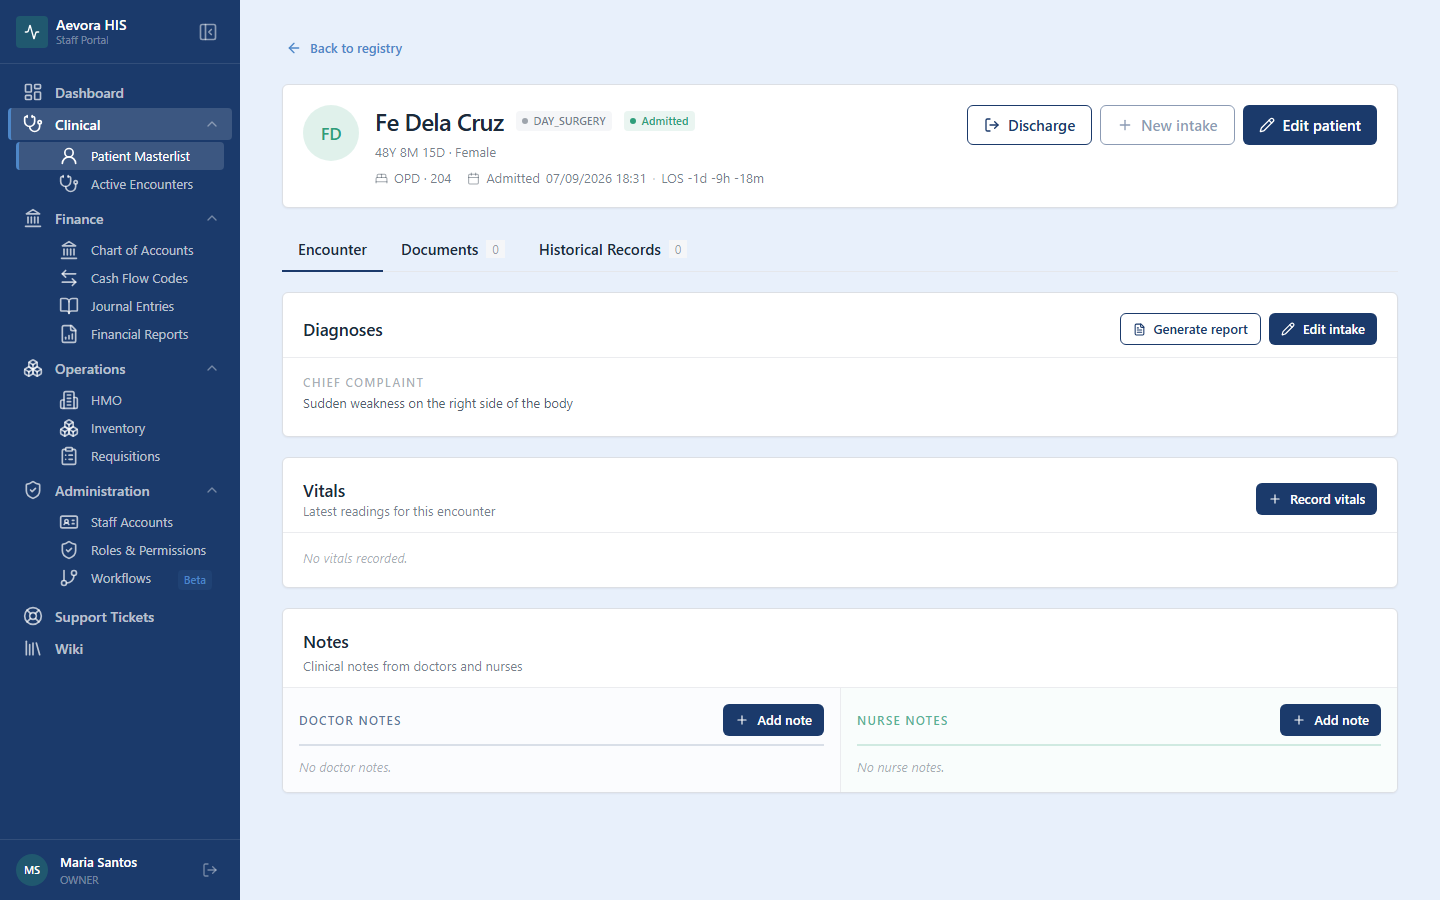
Section titled “Introduction”The Encounter tab on a patient’s chart is the running clinical narrative for the current visit — vital sign readings taken over time, plus notes written by doctors and nurses as the encounter progresses.
Key Concepts
Section titled “Key Concepts”Vitals vs. Doctor Notes vs. Nurse Notes
Section titled “Vitals vs. Doctor Notes vs. Nurse Notes”These are three distinct record types, each with its own permission set — a nurse’s ability to record vitals doesn’t automatically grant access to write a doctor’s note, and vice versa:
| Record type | Who typically records it | Permission resource |
|---|---|---|
| Vital signs | Nurses | vitals |
| Doctor notes | Physicians | doctor notes |
| Nurse notes | Nurses | nurse notes |
All three follow the same void-not-delete pattern: an incorrect entry is never removed from the record, only marked voided with a reason. This preserves a complete, tamper-evident audit trail — voided entries stay visible (struck through or grayed out) rather than disappearing.
Normal Ranges and Out-of-Range Highlighting
Section titled “Normal Ranges and Out-of-Range Highlighting”Vitals outside the expected adult range are highlighted in amber and bolded so an abnormal reading is impossible to miss on the chart:
| Vital | Normal range |
|---|---|
| Blood pressure (systolic) | 90–140 mmHg |
| Blood pressure (diastolic) | 60–90 mmHg |
| Heart rate | 60–100 bpm |
| Respiratory rate | 12–20 breaths/min |
| Temperature | 36.1–37.2 °C |
| Oxygen saturation | 95–100% |
Height, weight, and pain score have no highlighted range — they’re recorded but not flagged.
Use Cases
Section titled “Use Cases”Recording New Vitals
Section titled “Recording New Vitals”Vitals are captured during the intake wizard when an encounter opens, and again at any point during the encounter:
- Open the encounter and go to the Encounter tab.
- Click Add Vitals.
- Enter the readings you have — blood pressure, heart rate, respiratory rate, temperature, oxygen saturation, pain score, height, and weight. Not all fields are required every time.
- Click Save.
The new reading appears at the top of the vitals table, timestamped and attributed to the staff member who recorded it.
Voiding an Incorrect Vitals Entry
Section titled “Voiding an Incorrect Vitals Entry”- Find the incorrect reading in the vitals table.
- Click Void.
- Choose a reason: Duplicate entry, Incorrect values, Wrong patient, Equipment error, or Others (specify).
- Confirm.
The entry remains in the table, marked as voided, rather than disappearing.
Adding a Doctor’s Note
Section titled “Adding a Doctor’s Note”- Open the encounter and go to the Encounter tab.
- Click Add Note under the Doctor Notes section.
- Write the note content.
- Click Save.
The note is timestamped and attributed to the physician who wrote it.
Adding a Nurse’s Note
Section titled “Adding a Nurse’s Note”Follow the same steps as a doctor’s note, under the Nurse Notes section. Nurse and doctor notes are tracked separately even though they appear on the same tab.
Voiding a Clinical Note
Section titled “Voiding a Clinical Note”Click Void on the note, choose a reason (the same list used for vitals), and confirm. Only staff holding the void permission for that specific note type (doctor or nurse) can void it — a nurse cannot void a doctor’s note, and vice versa.
Reference
Section titled “Reference”Permissions
Section titled “Permissions”| Resource | Actions |
|---|---|
vitals |
view, create, void |
doctor notes |
view, create, void |
nurse notes |
view, create, void |